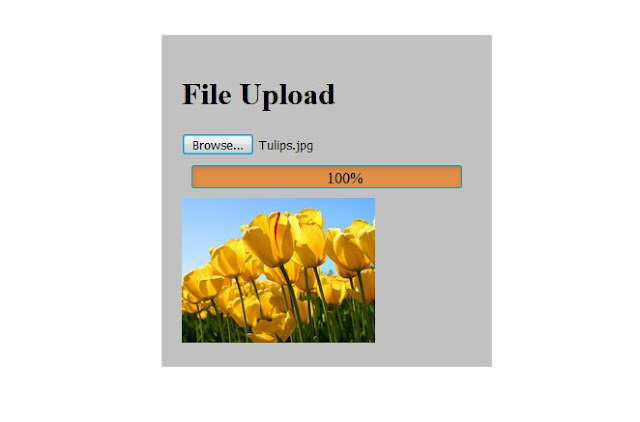
In this tutorial, we will see how to create a file upload functionality with progress bar. Progress bar tells us, how much content is uploaded using normal HTML, jQuery, AJAX and PHP (as a back end). I have used a custom CSS styling to create a progress bar and to design other markup elements like list of uploaded images.
Before starting this, you should have a basic knowledge of all above mentioned technologies to understand it properly.
<!DOCTYPE html>
<html>
<head>
<title>File Upload with Progress Bar</title>
<!-- Custom stylesheet -->
<link rel="stylesheet" type="text/css" href="upload-file-progress-bar-style.css">
</head>
<body>
<div class="container">
<!-- heading -->
<h1>File Upload</h1>
<form action="upload-file.php" method="post" enctype="multipart/form-data" id="upload_file_form" name="upload_file_form">
<!-- input field -->
<input type="file" name="files" id="files">
</form>
<!-- progress bar of upload status with progress in percent -->
<div id="progress-files">
<div class="progress-bar-files"></div >
<div class="status-files">0%</div>
</div>
<!-- list of the files uploaded -->
<div class="files-list"></div>
</div>
<script type="text/javascript" src="jquery.min.js"></script>
<script type="text/javascript" src="file-upload.js"></script>
</body>
</html>
// files upload
$("#files").on("change", function(){
$.ajax({
url: $("#upload_file_form").attr("action"),
data: new FormData($("#upload_file_form")[0]), // $(form).serialize(),
type: "post",
dataType: "JSON",
cache: false,
contentType: false,
processData: false,
xhr: function(){
//upload Progress
var xhr = $.ajaxSettings.xhr();
if (xhr.upload) {
xhr.upload.addEventListener('progress', function(event) {
var percent = 0;
var position = event.loaded || event.position;
var total = event.total;
if (event.lengthComputable) {
percent = Math.ceil(position / total * 100);
}
// console.log(percent)
//update progressbar
$(" .progress-bar-file").css("width", + percent +"%");
$(" .status-files").text(percent +"%");
}, true);
}
return xhr;
},
mimeType:"multipart/form-data"
}).done(function(response){ //
if(response.flag){
var html = "<a href='" + response.src + "'><img width='200' src='" + response.src + "' alt=''></a>";
$(".files-list").append(html);
}
// location.reload();
});
});
Above code contains the normal ajax call with xhr, which handles the progress of the file upload and shows it in the form of progress bar.
<?php
// chekcs whether data for upload exists or not
if(isset($_FILES['files']))
{
$uploadfile=$_FILES["files"]["tmp_name"];
$folder="uploads/";
// checks whether file is uploaded or not
if(move_uploaded_file($_FILES["files"]["tmp_name"], $folder.$_FILES["files"]["name"])){
echo json_encode(array("flag" => true, "msg" => "File uploaded successfully!", "src" => $folder . $_FILES["files"]['name']));
} else {
echo json_encode(array("flag" => false, "msg" => "Failed to upload file..."));
}
// echo '<img src="'.$folder."".$_FILES["upload_file"]["name"].'">';
// exit();
}
?>
So, in this tutorial, we have learnt how to create a file upload functionality with progress bar. Please like and share the post with your friend if you find it useful.
Before starting this, you should have a basic knowledge of all above mentioned technologies to understand it properly.
Following are the steps:
To create HTML markup using bootstrap:
Below code is a markup for file upload functionality. Create a new file and save it with the name file-upload-progres-bar.html and copy below code in the same file.<!DOCTYPE html>
<html>
<head>
<title>File Upload with Progress Bar</title>
<!-- Custom stylesheet -->
<link rel="stylesheet" type="text/css" href="upload-file-progress-bar-style.css">
</head>
<body>
<div class="container">
<!-- heading -->
<h1>File Upload</h1>
<form action="upload-file.php" method="post" enctype="multipart/form-data" id="upload_file_form" name="upload_file_form">
<!-- input field -->
<input type="file" name="files" id="files">
</form>
<!-- progress bar of upload status with progress in percent -->
<div id="progress-files">
<div class="progress-bar-files"></div >
<div class="status-files">0%</div>
</div>
<!-- list of the files uploaded -->
<div class="files-list"></div>
</div>
<script type="text/javascript" src="jquery.min.js"></script>
<script type="text/javascript" src="file-upload.js"></script>
</body>
</html>
To create a JavaScript code using an Ajax to handle file upload from client end (browser):
Now, create a JavaScript file and name it as file-upload.js and Copy the below code in it.// files upload
$("#files").on("change", function(){
$.ajax({
url: $("#upload_file_form").attr("action"),
data: new FormData($("#upload_file_form")[0]), // $(form).serialize(),
type: "post",
dataType: "JSON",
cache: false,
contentType: false,
processData: false,
xhr: function(){
//upload Progress
var xhr = $.ajaxSettings.xhr();
if (xhr.upload) {
xhr.upload.addEventListener('progress', function(event) {
var percent = 0;
var position = event.loaded || event.position;
var total = event.total;
if (event.lengthComputable) {
percent = Math.ceil(position / total * 100);
}
// console.log(percent)
//update progressbar
$(" .progress-bar-file").css("width", + percent +"%");
$(" .status-files").text(percent +"%");
}, true);
}
return xhr;
},
mimeType:"multipart/form-data"
}).done(function(response){ //
if(response.flag){
var html = "<a href='" + response.src + "'><img width='200' src='" + response.src + "' alt=''></a>";
$(".files-list").append(html);
}
// location.reload();
});
});
Above code contains the normal ajax call with xhr, which handles the progress of the file upload and shows it in the form of progress bar.
To create a PHP code to handle file upload from server end:
Now, the backend with php. It is useful to save the files either on the server or the database.
// chekcs whether data for upload exists or not
if(isset($_FILES['files']))
{
$uploadfile=$_FILES["files"]["tmp_name"];
$folder="uploads/";
// checks whether file is uploaded or not
if(move_uploaded_file($_FILES["files"]["tmp_name"], $folder.$_FILES["files"]["name"])){
echo json_encode(array("flag" => true, "msg" => "File uploaded successfully!", "src" => $folder . $_FILES["files"]['name']));
} else {
echo json_encode(array("flag" => false, "msg" => "Failed to upload file..."));
}
// echo '<img src="'.$folder."".$_FILES["upload_file"]["name"].'">';
// exit();
}
?>
So, in this tutorial, we have learnt how to create a file upload functionality with progress bar. Please like and share the post with your friend if you find it useful.

0 Comments